bauhaus_worksheet #2: Illusion of movement
How do you make colours and lines dance on a piece of paper? The Bauhaus student Monica Bella Ullmann-Broner created an amazing illusion of movement using very basic materials. The project she completed in 1929/30 in Josef Albers’ preliminary course serves as the model for the following instructions.
Download the bauhaus_worksheet #2 (PDF)
You’ll need:
- pencil
- coloured pencil
- scissors
- ruler
- compass
- 3 sheets of paper (DIN A4), single colour (heavier paper, if you have some)
- adhesive tape
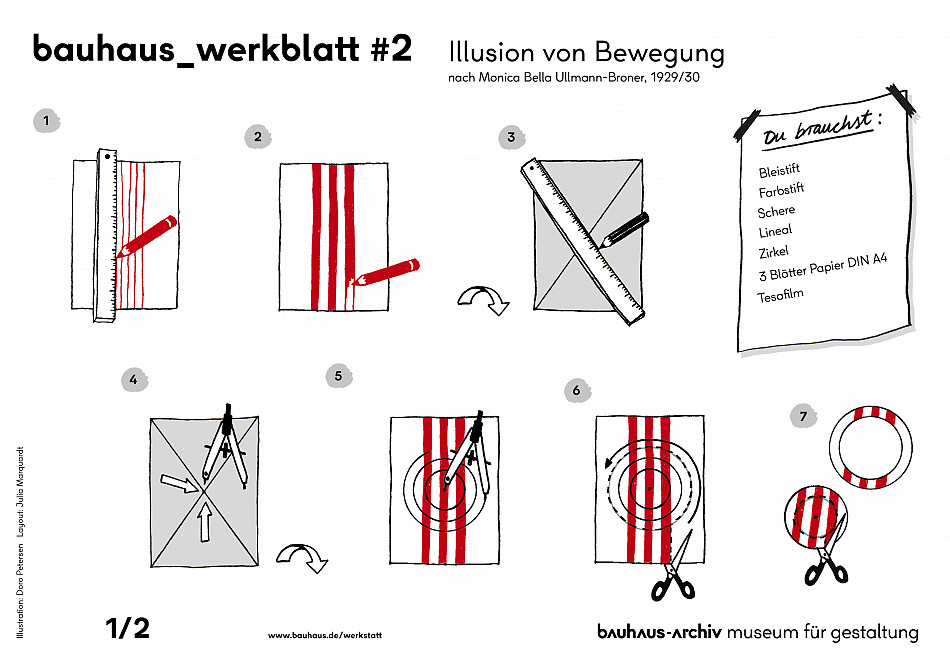
Place a sheet of paper in front of you, long side up. With your ruler, draw three parallel lines in the middle from top to bottom. (It doesn’t matter if they’re exactly the same thickness or equally set apart from one another)
Colour in three stripes with your coloured pencil. (You could also cut strips of coloured paper and glue them onto the sheet to create stripes.)
Flip the sheet over. Fold the paper at the opposite corners to make diagonal creases. The spot where the creases intersect is the centre.
Poke a small hole through the centre with the sharp point of your compass. Now flip the sheet over to the front.
Insert the spike of the compass into the hole and make three concentric circles of different sizes – a large, medium and small circle.
With your scissors, cut along the edge of one of the stripes until you reach the edge of the outermost circle. Cut out the entire circle but be careful not to make any mistakes! Take your time and cut carefully!
Now repeat the previous step. Start cutting at the edge of a coloured stripe until you reach the medium circle, and then cut out the medium ring. Repeat again for the smallest circle. Now you should have a large ring, a medium-sized ring, and a small circle.
Flip all the pieces over. Take the tape and seal all the cuts you made into the rings and the sheet of paper. Now flip everything over to the front.
Take a new sheet of paper. Lay your circle collage on top and place the paper rings in their original position.
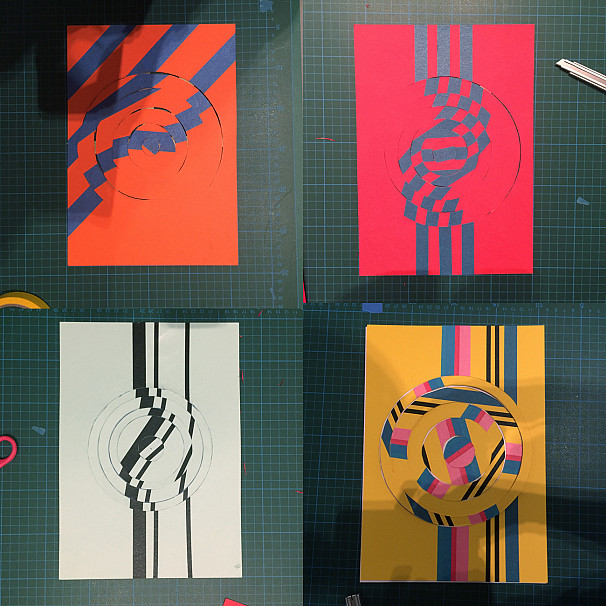
Now it’s time to experiment! Turn and twist the paper rings in a way that looks best to you!
Are you satisfied with your new design? Take another piece of paper and lay it on top of your finished work. With one hand underneath and one on top, press the sheets together so that you can flip your artwork over.
Tape all the rings and the striped paper together on the back to keep them from moving.
Flip it over – you’re done!
Experiment! Different colours, more stripes, different thicknesses, diagonal or horizontal stripes, more circles ...


